Menu
$ AUD
-
$ AUD
-
$ NZD
-
$ USD
-
€ EUR
-
$ CAD
-
د.إ AED
-
$ ARS
-
R$ BRL
-
£ GBP
-
Ft HUF
-
₹ INR
-
kr. ISK
-
KSh KES
-
RM MYR
-
K PGK
-
₲ PYG
-
₱ PHP
-
zł PLN
-
₽ RUB
-
R ZAR
-
฿ THB
-
₺ TRY
People say you must check your trailer bearings every 10,000km or grease them every 12 months. While this is an excellent reminder for all trailer owners, you should perform regular checks no matter how much or how little you use your trailer.
The good news is that, with a bit of patience, you can check and change your own bearings at home, saving you cash. Spotting the signs of a failing bearing early on can negate the risk of being stranded in the middle of nowhere and having to fork out money for repairs.
The leading causes of bearing failure are:
As the trailer travels, the grease inside the bearing begins heating up. Suppose there is too much friction from a lack of lubrication or compromised lubrication from excess loads or overtightened axle nuts. In that case, this might result in metal-on-metal contact, increased friction, and overheating bearings. Over time, the bearing metal grinds and breaks down before eventually failing—destroying itself, the hub, and sometimes the spindle shaft.
Grease contamination can occur before or after your bearings have been packed. Despite grease typically having a long shelf-life, heat, and container degradation can result in grease separation. You’ll notice this as a film of oil sitting on top of the remaining grease product—do not use grease if it looks like this!
Grease contamination within your trailer bearing (i.e., after the bearing has been packed) occurs when the bearing seal cannot hold its vacuum. If the vacuum fails, air and dust can enter the system, leading to increased friction, heat, and bearing failure.
Fortunately, bearing failure is usually progressive. Top tips to avoid severe road incidents and hefty repair bills:
If you’re planning a big trip and know the last bearing service was a long time ago, checking and repacking the grease is always a good idea—even if everything appears in order.
Throughout your journey, stop and check your hubs for excess heat. If they are too hot to touch, they are overheating and will need some attention. They should be warm but not excessively hot (you should be able to hold your hand on them). If you can wave your hand in front of them and feel heat, you have a severe problem!)
It may also be worth carrying a spare set of bearings on long journeys.
Before removing your wheels and hubs to do a proper inspection of your bearings, check the following:
All the above can indicate that your bearings need urgent attention. Let’s remove the wheels and hubs (one at a time!) to inspect the bearing assembly.
Look at all the components, particularly the inner and outer bearings, the bearing race, and the seals. Are there any signs of visual damage, such as burn marks or discolouration? Do the seals appear dry, brittle, or cracked? Any abnormalities mean you need a bearing replacement. If everything appears in order, you may only need to repack the bearing grease.
Bearings have a long service life if used within operating limits and regularly maintained. If installed correctly, you shouldn’t experience any of the following when in use:
If you experience any of the above, it may be time to replace them. Also, if the trailer is old or you know the hub has been contaminated or operated without sufficient grease, replace the bearings immediately.
Bearings aren’t one-size-fits-all. The kind of bearing you need is linked to the type of axle you have and, in some cases, the type of trailer. For example, boat trailers generally have a more robust seal to prevent water contamination. You can use marine-grade seals for general road-use trailers, but we don’t recommend the reverse situation.
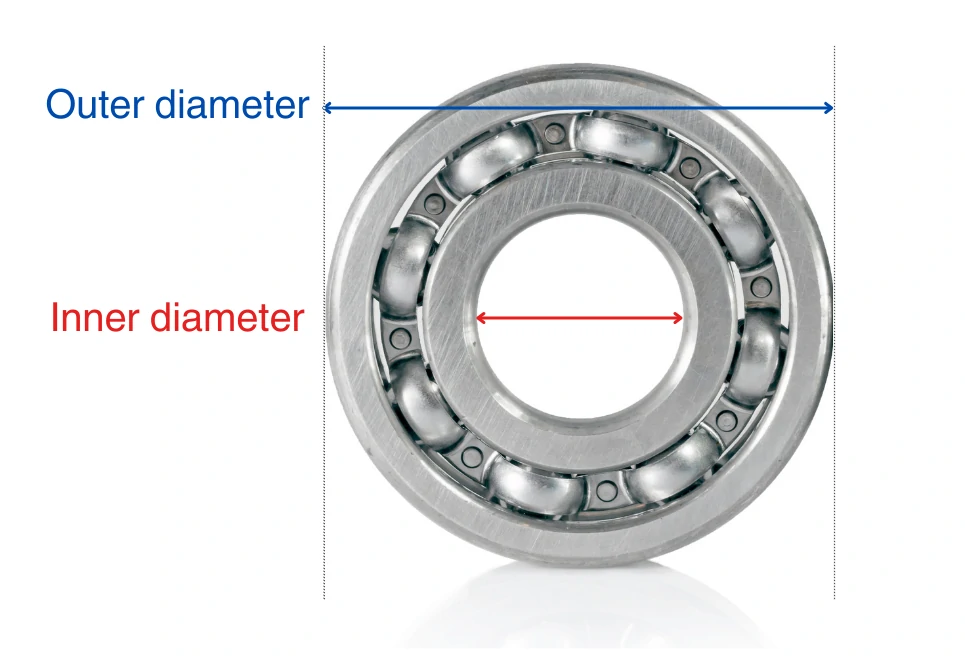
The easiest way to source the correct replacement bearing kit is to remove the hub and find the reference numbers stamped into the metal of both the inner and outer bearings. Your local supplier can match these numbers to ensure you get a suitable replacement kit.
If you can’t find these reference numbers, don’t stress! The next thing to do is to take measurements of both the bearings. Make a note of the following (it is best to use callipers):
Even if you’re unsure whether your bearings need replacing, keeping a spare on hand is always a good idea.
Almost anyone can achieve bearing replacements if they know what they’re doing—luckily, we’re here to explain how.
The first thing you need to do is determine what replacement bearings you need. Hopefully, you’ve already figured this out from our previous section and have managed to secure some from a local supplier.
Next, you will need the following tools:
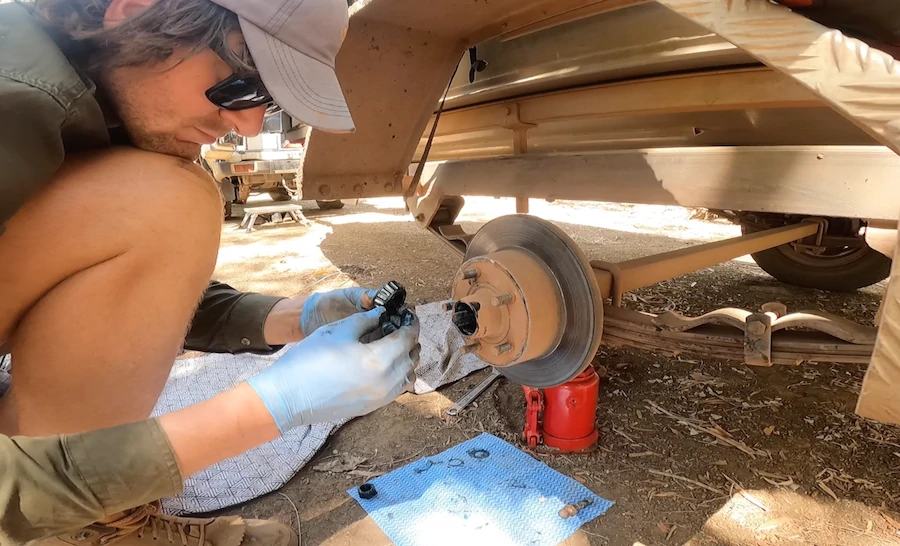
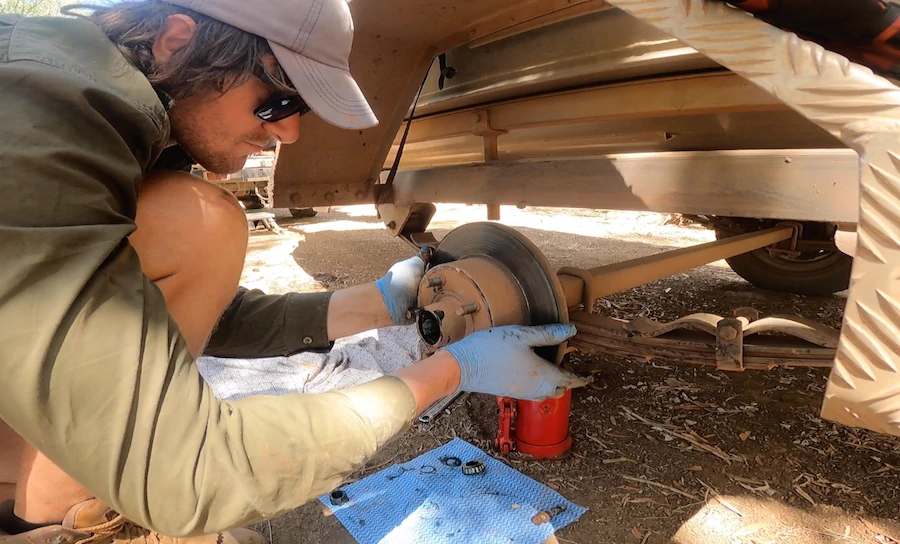
1. Jack up – Jack one side of the trailer up and use a wrench or other tool to remove the wheel nuts and wheel.
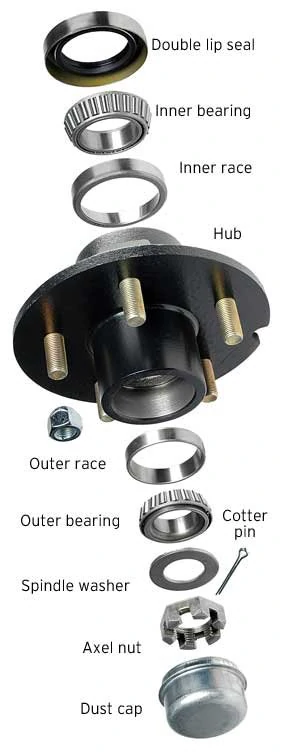
2. Remove the hub assembly – Remove the existing dust (grease) cap, split pin, axle nut (castle nut), and the washes from the hub assembly. Carefully lift the hub assembly off the spindle shaft, ensuring the outer bearing doesn’t fall out. An excellent way to do this is to grab the outer edge of the hub assembly with your fingers and place both thumbs over the outer bearing so it doesn’t fall out. Place the assembly face-up on a clean surface.
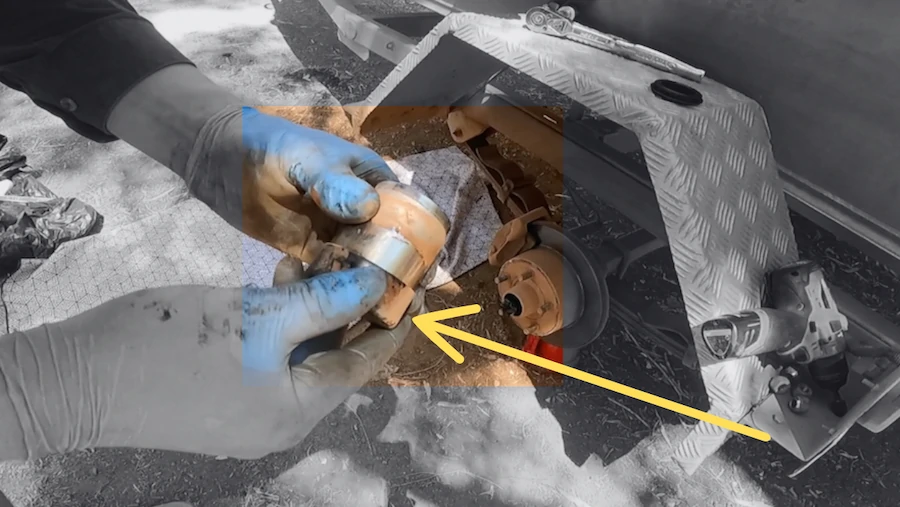
3. Remove the old bearings – Remove the outer bearing from the hub. Each bearing has a pair of races/rings (inner and outer race) that hold the ball bearings between them. By removing the bearing, you are also removing the races.
Use a suitable solvent (degreaser/break cleaner) to remove old grease from the hub assembly. This will provide easier access to the inner bearing. Place a punch against the inner bearing. Tap the punch with a hammer to knock the inner bearing and its seal out from the top. If it doesn’t pop off, you may need to work your way around the bearing.
4. Clean and inspect the old bearings – While the initial diagnosis may have indicated an issue with your bearings, you should take a good look at them to confirm—this may prevent you from needing to replace both bearings in their entirety. Use a clean rag and kerosene (or a suitable solvent) to remove old grease. To avoid skin irritation, wear rubber gloves.

5. Inspect and grease the spindle – Next, look for any scoring or thread damage on the spindle and apply a light layer of grease to assist in the installation of the new bearings and keep the spindle well lubricated.
6. Inspect the hub – Ensure the hub centre and back is free of indentations, dirt or other contaminants.
7. Prepare the new bearings – Pack the new bearings with grease by forcing grease between the rollers and the bearing cage. To make things easier, work from the larger side of the bearing. Make sure the grease has made it all the way through all the crevices to come out the other side of the bearing. One way to do this is to fill the palm of your hand with grease and rub it into the crevices of the bearing. Next, smear a finger full of grease onto the outside of the rollers (completely covering the bearing).
8. Prepare the hub – Use your finger to coat the inside of the hub with grease. Do this for the back and front where the bearings will be inserted. Important: Don’t keep packing grease for the sake of it. Overgreasing can lead to too much pressure and cause overheating. The bearings should be thoroughly coated between the rollers and cage and on the outside of the rollers. A finger full or two coatings should be sufficient for the inside of the hub.
9. Install new bearings – With the hub face-down on your workbench, install the inner bearing (small end in first). Next, place the seal on top so that the seal lip faces the bearing (the ‘lip’ is the metal part of the seal). Gently tap it with a hammer until it is flush. If the seal isn’t flush, you may end up with contaminated grease, grease leaks and more bearing issues! Flip the hub back over and insert the outer bearing (small end first).
10. Refit the hub – Slide the hub back on to the spindle shaft, using your thumbs to prevent the outer bearing from falling off. If the hub doesn’t slide easily, you may need to add more grease to the spindle. Slide the hub carefully back onto the spindle shaft—you don’t want to damage the seal on the back of the hub.
11. Bearing adjustment – Fit the main washer to the end of the spindle to cover the outer bearing. Next, put the adjusting nut back in place and start tightening it by hand. You can finish tightening the nut with a wrench, tightening it all the way and then loosening it a touch before retightening. This makes sure the nut is appropriately adjusted.
12. Finishing touches – Before sliding a new split pin in place, we recommend loosening the adjustment nut by a quarter of a turn. This ensures that the hubs aren’t too tight – remember, this could result in bearing failure because the excessive friction will compromise the lubrication and overheat the bearings. Spin your trailer wheel and check for any side-to-side movement before installing the split pin in pace and bend the end with pliers. Hammer a new dust cap in place over the adjustment nut, hitting it around the perimeter to securely keep it in place.
Bearing buddies are caps designed to protect bearings from contaminants like water and dust. They range in design from simple rubber dust caps to spring-loaded caps designed to maintain constant grease pressure.
While bearing buddies may reduce the risk of contamination, bearing inspections will still be required just as frequently. There really is no substitute for an adequately greased bearing and hub assembly.
You now know what trailer bearings do, why they fail, how to find a suitable replacement kit, and how to fit your new bearings!
We recommend checking your trailer bearings frequently, regardless of how often (or not) you use your trailer. With regular checks, you can detect issues early to avoid bearing failure and enjoy worry-free hauling.