
Menu
$ AUD
-
$ AUD
-
$ NZD
-
$ USD
-
€ EUR
-
$ CAD
-
د.إ AED
-
$ ARS
-
R$ BRL
-
£ GBP
-
Ft HUF
-
₹ INR
-
kr. ISK
-
KSh KES
-
RM MYR
-
K PGK
-
₲ PYG
-
₱ PHP
-
zł PLN
-
₽ RUB
-
R ZAR
-
฿ THB
-
₺ TRY
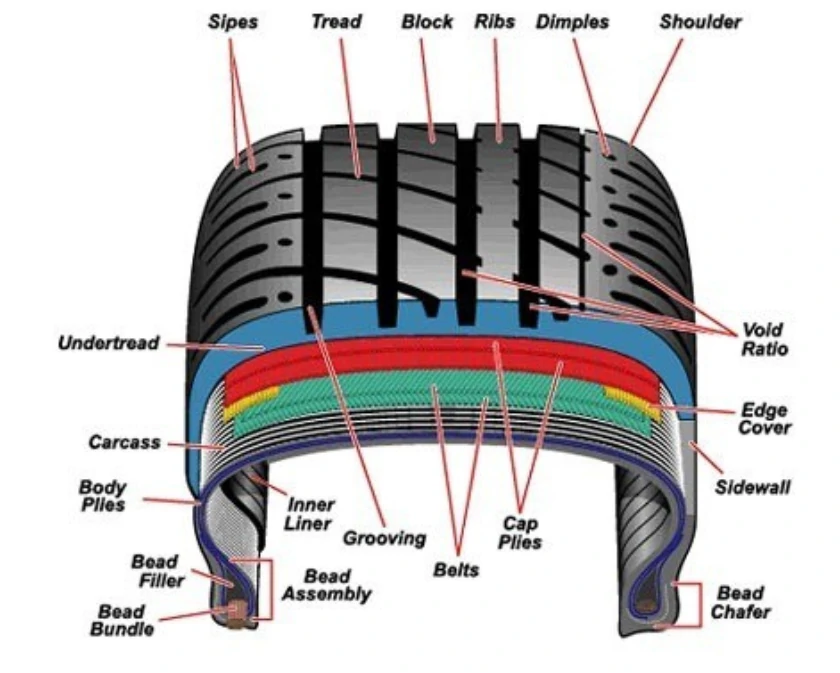
Tires (or tyres, different spelling for different countries) play a crucial role in vehicle performance, influencing braking, handling, and overall driving experience.
Below are some of the main components of a tire’s anatomy.
Tires fulfill several crucial functions in vehicle operation.
For tires to perform, they require:
As a vehicle moves, it relies on the transmission of forces between itself and the road surface via the tires. This transmission is pivotal for maintaining control and stability, especially under varying road conditions.
The interaction between the vehicle’s powertrain system (all the components that work together to generate power and transmit it to the wheels to propel a car forward) and the road generates forces crucial for propulsion and manoeuvring. These forces are effectively managed by the tires’ contact with the road surface, ensuring that the vehicle remains responsive and stable during acceleration, braking, and steering.
Various factors influence the vehicle’s motion, including rolling resistance, wheel slip, and the wheels’ effective radius. Additionally, the transmission of lateral and longitudinal forces between the tires and the road surface profoundly impacts the vehicle’s overall behaviour and performance.
To better understand the influence of tires on a vehicle’s performance, let’s look at the tire forces at play:
Tire ratings are the standard indicators for performance aspects that help consumers select the correct tyre for the required use. There are two significant ratings: load index and speed ratings.
This numeric value on the sidewall of a tire identifies the maximum allowable load (kgs) carried by a single tire. Load ratings exist to prevent tire overload and ensure safe operating conditions as per the manufacturer’s recommendation. Overloading can result in premature tire wear, not to mention severe heat generation, leading to tire failure.
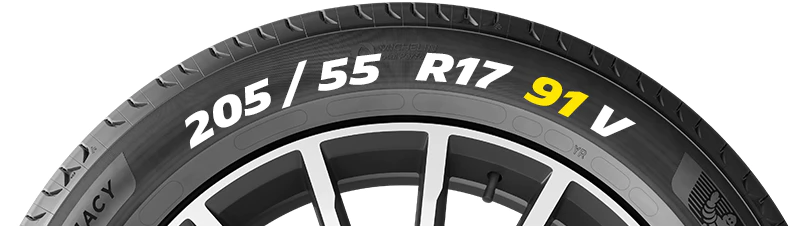
The following is a breakdown of each of the digits/symbols displayed on the above tire code example.
| Width | Height | Diameter | Load Rating Value | Speed Rating |
|---|---|---|---|---|
| 205 | 55 | R17 | 91 | V |
The table below shows a single tire’s standard maximum allowable load with a corresponding load rating value. In the given example, the load rating value for the tire is 91. Looking at table below, we can see that the corresponding maximum allowable load in kilograms is 615kgs. Generally, the higher the load index or rating, the stronger the tire.
| Load Index | Maximum Load (KG) | Load Index | Maximum Load (KG) |
|---|---|---|---|
| 70 | 335 | 87 | 545 |
| 71 | 345 | 88 | 560 |
| 72 | 355 | 89 | 580 |
| 73 | 365 | 90 | 600 |
| 74 | 375 | 91 | 615 |
| 75 | 387 | 92 | 630 |
| 76 | 400 | 93 | 650 |
| 77 | 412 | 94 | 670 |
| 78 | 425 | 95 | 690 |
| 79 | 437 | 96 | 710 |
| 80 | 450 | 97 | 730 |
| 81 | 462 | 98 | 750 |
| 82 | 475 | 99 | 775 |
| 83 | 487 | 100 | 800 |
| 84 | 500 | 101 | 825 |
| 85 | 515 | 102 | 850 |
| 86 | 530 | 103 | 875 |
The maximum speed at which a tire can operate smoothly is known as speed rating and is commonly denoted by the letters T, H, V, W or Z on the tire sidewall. The ability to manage driving speeds depends entirely on the tire’s speed rating – higher speed ratings will allow handling of high-speed driving.
Here is a general guide to tire speed ratings:
| Speed Rating | Maximum Speed |
|---|---|
| T | 118 mph (190 kph) |
| H | 130 mph (210 kph) |
| V | 149 mph (240 kph) |
| W | 168 mph (270 kph) |
| Z | 149+ mph (240+ kph) |
The term “tire pressure” describes the pressure of the air inside a tire measured in kilopascals (kPa) or pounds per square inch (psi). Correct tire pressure ensures optimal tire performance, an even distribution of loads, and smooth contact with the road surface.
Tire pressure, speed rating, and load rating are interrelated factors that collectively determine a tire’s performance and suitability for specific vehicles.
A tire can only safely carry the desired load if correctly pressurized. Subsequently, your tires will fail to meet their designed speed rating.
Load index aside, reaching the desired speed rating requires the correct tire pressure. The recommended tire pressure ensures sidewall stiffness and proper shape, providing stability and traction.
Tire placards contain helpful information to help users select the correct tire for their vehicle, including the tire size, the inflation pressure of rear and front tires, tire construction, speed rating, and the manufacture date.
In Australia, tire placards are legally mandated and have been required in all new passenger, 4×4, and light truck vehicles since 1973. Regarding 4×4 vehicles, two placards are commonly displayed depending on the vehicle’s intended use – one to cover a passenger load and one for light-truck fitment. In Australia, each tire has a tire identification number on the sidewall comprising four digits. For example, if the digits are 0218, the tire was manufactured in the second week of 2018. Figure 4 below indicates the different terminologies associated with the tires manufactured in Australia, along with their identification placards.
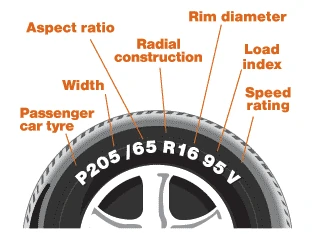
In the USA, the DOT tire identification number shows compliance with the standards of safety established by the US Department of Transportation. It provides additional information about the manufacturing of tires. It is usually displayed as 12 numbers and letters on the tire’s sidewall. The first two letters are the plant code where the tire was manufactured, and the last three to four digits indicate the week and year of manufacturing. Figure 5 shows the breakdown of valuable information provided on tire placards.

Recently, in the US, providing a partial DOT serial number on tires has been declared essential to indicate the manufacturer, plant, and tire size information. The partial DOT number may not help provide the manufacturing date, but it can still assist customers. The aim of using partial DOT instead of complete DOT is to ease tire identification without putting the vehicle on a lift – complete DOT numbers are mounted towards the inboard side of the vehicle.

Using suitable tires according to your vehicle type should be a priority. For example, using car tires instead of trailer tires can cause severe problems because trailer tires are designed to carry heavy loads and provide stability to the vehicle. Due to these higher loads and higher friction, there is a large amount of heat generation, dissipated by the optimised design of trailer tire tread and sidewalls – something your typical car tire can’t handle.
In conclusion, understanding tires, their ratings, labels, and applications is crucial for ensuring optimal vehicle performance and safety. Tires serve as the sole point of contact between a vehicle and the road, influencing braking, handling, and overall driving experience.
By exploring tire anatomy, function, and the various forces they encounter, we gain insight into their critical role in vehicle dynamics. Tire ratings, including load index and speed ratings, provide essential guidelines for selecting the right tires for specific vehicles and driving conditions. Additionally, tire placards offer valuable information to assist users in making informed decisions about tire selection and maintenance.
Ultimately, choosing the appropriate tires for a vehicle’s needs is essential for ensuring efficiency, stability, and safety on the road.
Q1: Can I put car tires on a trailer?
Hopefully, after reading this article, you now know tires are made to carry specific loads. Car tires generally have lower load and higher speed ratings than trailer tires.
Q2: Where can I find the correct tire pressure for my vehicle?
The correct tire pressure is on the tyre placard or manufactures plate, it can also be found on the tyre side wall.
Q3: How can I increase the life of my tires?
Select the correct tyre for your application. Regularly check for proper tyre inflation, rotate and balance wheels if required.