Fabplans

$ AUD
  • $ AUD
  • $ NZD
  • $ USD
  • € EUR
  • $ CAD
  • د.إ AED
  • $ ARS
  • R$ BRL
  • £ GBP
  • Ft HUF
  • ₹ INR
  • kr. ISK
  • KSh KES
  • RM MYR
  • K PGK
  • ₲ PYG
  • ₱ PHP
  • zł PLN
  • ₽ RUB
  • R ZAR
  • ฿ THB
  • ₺ TRY
$ AUD
  • $ AUD
  • $ NZD
  • $ USD
  • € EUR
  • $ CAD
  • د.إ AED
  • $ ARS
  • R$ BRL
  • £ GBP
  • Ft HUF
  • ₹ INR
  • kr. ISK
  • KSh KES
  • RM MYR
  • K PGK
  • ₲ PYG
  • ₱ PHP
  • zł PLN
  • ₽ RUB
  • R ZAR
  • ฿ THB
  • ₺ TRY
$ AUD
  • $ AUD
  • $ NZD
  • $ USD
  • € EUR
  • $ CAD
  • د.إ AED
  • $ ARS
  • R$ BRL
  • £ GBP
  • Ft HUF
  • ₹ INR
  • kr. ISK
  • KSh KES
  • RM MYR
  • K PGK
  • ₲ PYG
  • ₱ PHP
  • zł PLN
  • ₽ RUB
  • R ZAR
  • ฿ THB
  • ₺ TRY
$ AUD
  • $ AUD
  • $ NZD
  • $ USD
  • € EUR
  • $ CAD
  • د.إ AED
  • $ ARS
  • R$ BRL
  • £ GBP
  • Ft HUF
  • ₹ INR
  • kr. ISK
  • KSh KES
  • RM MYR
  • K PGK
  • ₲ PYG
  • ₱ PHP
  • zł PLN
  • ₽ RUB
  • R ZAR
  • ฿ THB
  • ₺ TRY
fabplans.com best trailer blueprints
$ AUD
  • $ AUD
  • $ NZD
  • $ USD
  • € EUR
  • $ CAD
  • د.إ AED
  • $ ARS
  • R$ BRL
  • £ GBP
  • Ft HUF
  • ₹ INR
  • kr. ISK
  • KSh KES
  • RM MYR
  • K PGK
  • ₲ PYG
  • ₱ PHP
  • zł PLN
  • ₽ RUB
  • R ZAR
  • ฿ THB
  • ₺ TRY
fabplans.com best trailer blueprints
$ AUD
  • $ AUD
  • $ NZD
  • $ USD
  • € EUR
  • $ CAD
  • د.إ AED
  • $ ARS
  • R$ BRL
  • £ GBP
  • Ft HUF
  • ₹ INR
  • kr. ISK
  • KSh KES
  • RM MYR
  • K PGK
  • ₲ PYG
  • ₱ PHP
  • zł PLN
  • ₽ RUB
  • R ZAR
  • ฿ THB
  • ₺ TRY

4 Step Guide to Replacing Trailer Lights

Have issues with faulty trailer lights or need to install new ones

Functional trailer lights are crucial for road safety, so you should check your lights every time before hitting the road. 

Here is our step-by-step guide to installing or replacing lights which will have you back in business in no time. But before we dive in, make sure you have got the following equipment:

  • A new set of 12-volt lights
  • Wire strippers
  • Electrical tape or heat shrink
  • Side cutters
  • Soldering iron
  • Solder
  • Screwdriver set

Step 1: Remove the old lights

  • Unscrew the lights and then disconnect or cut the wires directly behind the connection. 
  • Inspect the remaining wiring to check it is still in good condition. If the condition is good, strip 1-2 cm of insulation from all wires using wire strippers.

Step 2: Mount the new lights

  • Connect your trailer to the towing vehicle.
  • Mount one light to either side of the trailer in the exact location as the old lights. Ensure you note the number plate light requirement – one light in your kit will usually contain a clear plastic section on one side for this purpose.
  • The lights will have bolts already fitted or holes ready for bolts, depending on your kit type. Align these with the holes on your trailer, slide the bolts or screws through, and secure tightly
install trailer lights
Install your new trailer lights in 4 easy steps.

Step 3: Connect the wiring

  • If using heat shrink tubing, slide a strip over each existing wire before connecting them. 
  • Now, connect the wires from the lights to the new wiring. You should connect each colour wire on the light to the corresponding wire of the same colour on the trailer wiring. If the colours don’t match, you can use a test light while someone is in the vehicle using the signal indicators to determine which wire controls what light.
  • Use solder to join each wire as this will provide a solid long lasting connection.
  • Tighten the housing onto the trailer, applying a small amount of pressure to ensure connection with the earth wire but not enough to crack the plastic housing.
  • Repeat for the second light.
trailer light connectors
Trailer light connectors

Step 4: Test the connections

  • Connect the trailer plug to the socket on the vehicle and test all the lights.
  • At this point, it would be helpful to have someone else turn on each light, one at a time, to test if they are all functioning correctly – this includes the left indicator, right indicator, brake lights, and reverse lights.
  • If everything works perfectly, slide the heat shrink over the joins and apply heat to seal. If you do not have heat shrink, you can seal the connections using electrical tape to help keep moisture and dirt from entering, as well as insulating the joint.

In summary

Replacing faulty or broken trailer lights should be a safety priority. 

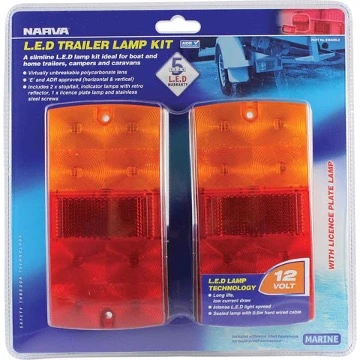
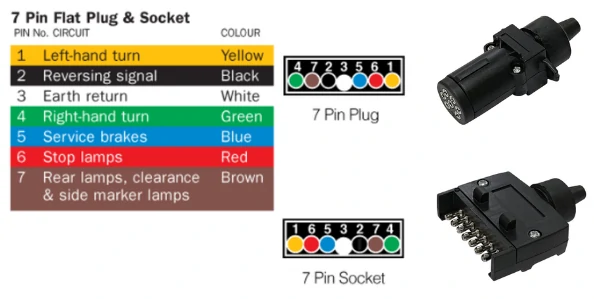
We’ve provided four easy-to-follow replacement steps to help those looking for a DIY job. In addition, most brands offer lighting diagrams with their trailer light products, like this one from Narva

Remember, if you encounter any issues with installing or replacing your trailer lights, consult an auto-electrician before heading out on the road. 

Like this post? Follow, like or share on your favourite social platform. You can leave us a comment below!

Facebook
Pinterest

Subscribe today!

To stay up-to-date with the latest trailer plan releases